Creating New Entities
Before a Client (or Timekeeper, Vendor, Major Client, etc) can be created, the person must first be created in the system as en entity. Entities can be created in two ways: through the Maintain Entity screen, or through the Entity Manager screen.
Option 1 - Creating Entities through the Maintain Entity Screen
Follow the menu path: Maintenance --> Entity --> Maintain Entity
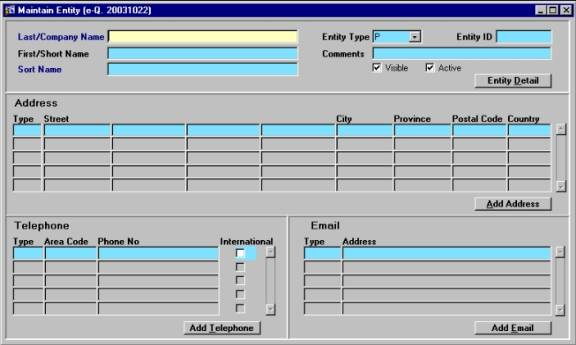
Figure 1 - The Maintain Entity Screen
- Enter the entity name in the Last/Company Name and First/Short Name fields
- The Sort Name field will be populated automatically
- The First/Short Name is NOT required
- In the Entity Type field, select either "P" for Person, or "C" for Company
- The Entity ID is a system generated number and this field cannot be edited
- Enter any additional information in the Comments field
- The Visible and Active fields default to being selected; these are only used when an entity is no longer being used (so when opening an entity, they should both be left selected)
- The Entity Detail button allows the user to enter additional details regarding the entity for people, details include gender, birth date, occupation, etc; or for companies, details include SIC, Incorporation Number and Date, Number of Officers, etc). The new entity must be saved before the user can use the Entity Detail button.
- In the Address section of the screen, the user can add addresses for the new entity
- To enter an address for the new entity, the user must click the Add Address button in the bottom right hand corner of the Address section The Address View screen will be launched
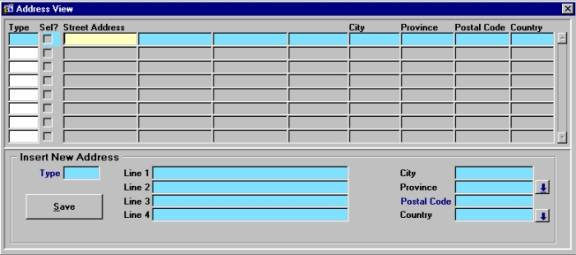
Figure 2 - The Address View Screen**
- In the top half of the Address View screen, the user can query up ( [F7] & [F8] ) addresses that already exist in the system
- To select an address that is in the query results, click in the Type field for the address record, and then press [F9]
- From the List of Values, select the Address Type
- "Check" the Sel? Field for the address record, and then click the X in the corner to close the screen
- The selected address will be displayed back on the Maintain Entity screen
- In the bottom half of the Address View screen, the user can enter a new address and assign it to the new entity
- Press [F9] in the Type field and select an Address Type from the List of Values Enter the Address information in the appropriate fields (Province and County have lists of values, and Postal Code is required)
- Press the Save button, and then click the X in the corner to close the screen The new address will be displayed back on the Maintain Entity screen To enter a telephone number for the new entity, the user must click the Add Telephone button in the bottom right hand corner of the Telephone section of the Maintain Entity screen
- The Telephone View screen will be launched
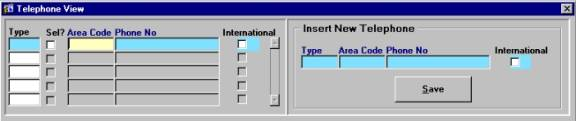
Figure 3 - The Telephone View Screen
- In the left hand side of the Telephone View screen, the user can query up ( [F7] & [F8] ) telephone numbers that already exist in the system
- To select a telephone number that is in the query results, click in the Type field for the telephone record, and then press [F9]
- From the List of Values, select the Telephone Type
- "Check" the Sel? field for the telephone record, and then click the X in the corner to close the screen
- The selected telephone number will be displayed back on the Maintain Entity screen
- In the right hand side of the Telephone View screen, the user can enter a new address and assign it to the new entity
- Press [F9] in the Type field and select a Telephone Type from the List of Values
- Enter the telephone number in the Area Code and Phone No fields
- If it is an International number, "check" the International field
- Press the Save button, and then click the X in the corner to close the screen
- The new telephone number will be displayed back on the Maintain Entity screen
- In the Email section of the Maintain Entity screen, the user can add email addresses for the new entity
- To enter an email address for the new entity, the user must click the Add Email button in the bottom right hand corner of the Email section
- The Email View screen will be launched
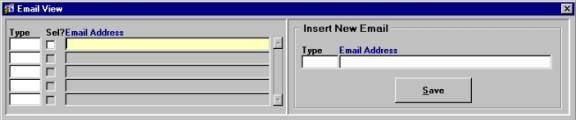
Figure 4 - The Email View Screen
- In the left hand side of the Email View screen, the user can query up ( [F7] & [F8] ) telephone numbers that already exist in the system
- To select an email address that is in the query results, click in the Type field for the email record, and then press [F9]
- From the List of Values, select the Email Type
- "Check" the Sel? field for the email record, and then click the X in the corner to close the screen The selected email address number will be displayed back on the Maintain Entity screen 4:49 PM New In the right hand side of the Email View screen, the user can enter a new email address and assign it to the new entity
- Press [F9] in the Type field and select an Email Type from the List of Values Enter the email address in the Email Address field Press the Save button, and then click the X in the corner to close the screen
- The new email address will be displayed back on the Maintain Entity screen
- Now that all the entity information has been entered, you must press [F10] or click the Save button on the menu bar at the top of the screen to save.
Option 2 - Creating Entities through the Entity Manager Screen
Follow the menu path: Maintenance --> Entity --> Entity Manager
OR: Desktop --> Entity Manager
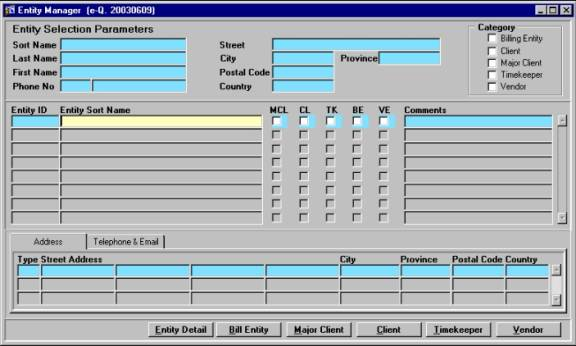
Figure 5 - The Enity Manager Screen
- Click in an empty line in the middle section of the screen (i.e. click on an empty row in the Entity Sort Name field, as seen in the Figure 5)
- Click on the Entity Detail button at the bottom of the screen
- New The user will then be taken to the Maintain Entity screen, where they can then follow the steps on creating entities, as outlined above
- When the information has been entered and saved in the Maintain Entity screen, the user can close that screen, and they will be returned to the Entity Manager screen, where the information for newly created entity will be displayed